About the Send Fax Interface
The Send Fax interface includes three tabs: Fax, Attachments and Options, used to include a variety of fax transmission information.
The Fax tab allows you to enter recipient phone numbers or addresses, specify a subject, select a cover page, and compose a cover page message.
If you are attaching a file, the only required field for sending a fax is the recipient fax phone number. If you are not attaching a file, you must, at minimum, include a cover page and message.
The FaxPress Send Fax interface supports a variety of addressing options, even allowing you to send your documents to fax and email recipients simultaneously.
| ■ | Use the To... field to enter fax numbers in any of these formats: |
recipient_fax_number
Recipient name @ recipient_fax_number
Recipient name @ company @ recipient_fax_number
@ company @ recipient_fax_number
| ■ | Use the User icon  to open a New Recipient interface. See About the Send Fax Interface for information. to open a New Recipient interface. See About the Send Fax Interface for information. |
| ■ | Use the To... button  to open the Phonebook field. to open the Phonebook field. |
See Creating Phone Books for more information.
| ■ | Use the Outlook Contact List button  to select fax recipients from your Contacts list. to select fax recipients from your Contacts list. |
Contacts selected using this button must have a Business Fax phone number. Email recipients cannot be entered here.
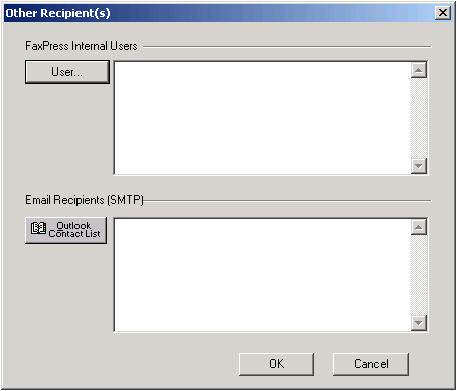
| ■ | Use the Other button  to open the Other Recipient(s) interface. to open the Other Recipient(s) interface. |
The Other Recipient(s) interface provides a way to add other FaxPress users to your list of recipients, and the Outlook Contact List button to add SMTP Email users from your Outlook Contacts to your list of recipients. Outlook Contacts added using this Other button do not need to have a Business Fax number in their contact information. The fax will be sent to their email address, and arrive as an attached file.
Favorite Messages
If a cover page is selected, a message that will appear on the cover page. can be entered in the Favorite Message field. The FaxPress supports up to 16 lines or 960 words in the field, or choose a message from the Favorite Message pulldown list to select a previously created message.
You can only select a Favorite Message from the pulldown list if you have already entered a message using the Save Message button.
For more information on Favorite Messages, see Using Favorite Documents.
The Save Message button saves messages you create in your Favorite Messages folder. When you click on the Save Message button, the Message Name screen appears for you to identify the message.
The Attachments tab allows you to attach native documents without having to convert them to fax format first. The conversion to fax format happens automatically. The only requirement is that the application must be installed on your client workstation.
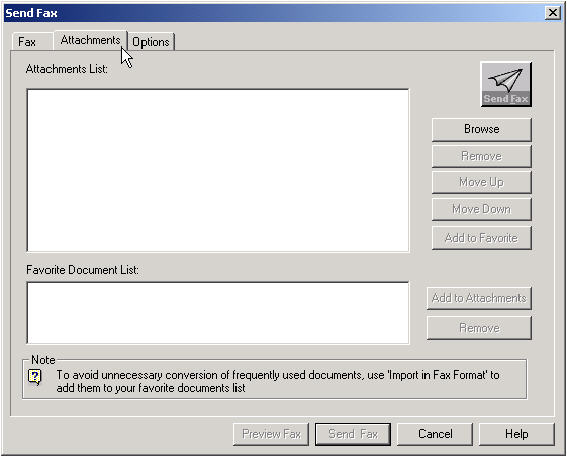
The Attachments tab allows you to:
| ■ | Add an attachment. Use the Browse button, select the document, then click Add to place it in the Attachments List |
| ■ | Arrange attachments. Use the Move Up and Move Down buttons. |
| ■ | Remove attachments from the list with the Remove button. |
The Options tab allows you to set fax delivery options.
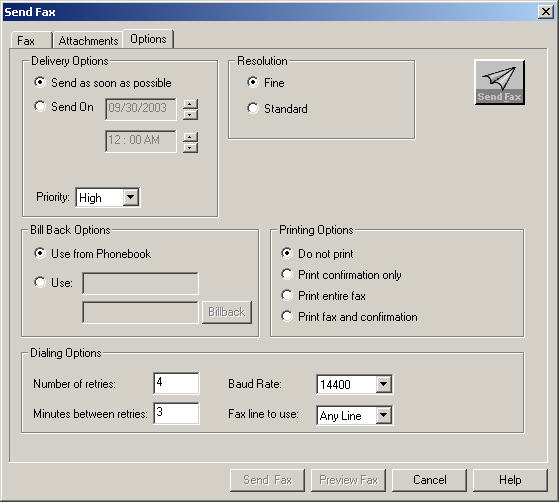
The Options tab allows you to set the following parameters:
| ■ | Delivery parameters. |
| ■ | Bill back parameters. |
| ■ | Dialing parameters. |
| ■ | Resolution. |
| ■ | Print parameters. |
Delivery Options — In this area you can specify immediate delivery or delivery on a specified day and time. This is an optional setting. The default is Send as soon as possible.
Bill Back Options — In this section you can specify a bill back code from a phonebook or database or find and specify a bill back option.
Dialing Options — These fields allow you to specify the Number of retries, Minutes between retries, Baud rate, and Fax line to use.
Resolution — In this area you can specify Fine (200 x 200 dpi) or Standard (100 x 200 dpi) resolution.
Printing — Use these radio buttons to specify:
Print entire fax — sends a complete copy of the fax to print.
Print confirmation only — prints a confirmation once the fax has been sent successfully. Confirmation consists of the first page of the fax compressed and a short notice of the transmission.
Do not print — which will suppress printing.
Accessing the Outgoing Fax Queue
The FaxPress server’s outgoing fax queue functions are accessed via FaxPress. Right-click on an outgoing fax to select from a variety of actions to apply to the fax.
|
FaxPress WebHelp
Last Updated: 9/12/2007
E-mail this page |
Castelle 855 Jarvis Drive, Suite 100 Morgan Hill, CA 95037 Toll-free 800.289.7555 Tel 408.852.8000 Fax 408.852.8100 |